| manual_la_english Sales Import Wizard |
   |
| manual_la_english Sales Import Wizard |
|
The Sales
Import Wizard enables you to import external sales figures from a comma-separated
values file (e.g. csv-file). Before you start the import process, please make
sure that the first row of this file has a column heading and you have at least read-only access.
The Revenue
Import Wizard is an assistant that will guide you step by step through the import
process. These steps are explained in detail on the next pages.
Open the Sales
Import Wizard by clicking on the ![]() -symbol in the
Revenue Import menu bar. Then the welcome page of the assistant will open.
-symbol in the
Revenue Import menu bar. Then the welcome page of the assistant will open.
Click “Next“ to move on to the next page of the assistant.
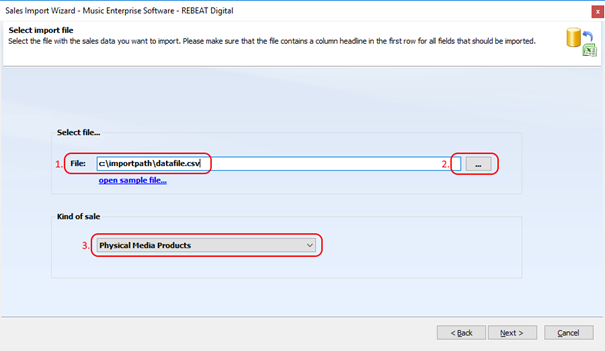
On this page you need to choose your importfile. If you
know the comple path with file names, you can enter it in the field “file” (see
1. in the figure above) or you can use the file-assistant for selecting your
file by clicking on the “…” button (see 2. in the figure above).
Once you’ve made your selection, the button “Next” will be
activated.
Note: By clicking on „open sample file“ you can take a look at a sample file,
save it locally and do a test run.
In the section “Kind of sale“, you choose the type (see 3. in the figure
above) to which the sales data will be added.
Example: If the file
you want to import contains physical products sales data, choose “Physical
Media Products“ (see 3. in the figure above). The data will then be added
automatically to the existing products of this type. In this case the
assignment will be based on the EAN code.
Once you’ve finished, click “Next“.

If you have already created a template during previous import
processes, you can select it here. A template offers you the possibility to
skip several set-up steps for recurring import processes and therefore saves a
lot of time. How to generate a template will be explained in a later step of
the assistant. Once you’ve made a selection, click “Next”.

Here you can choose the currency that represents the sales
data in your file with today’s currency exchange rate. In the green box you
find today’s currency exchange rate. This rate can also be changed manually.
Depending on whether or not you have selected a template
on the previous page, the assistant will lead you to different pages.
If you did not select a template, the following page
appears:
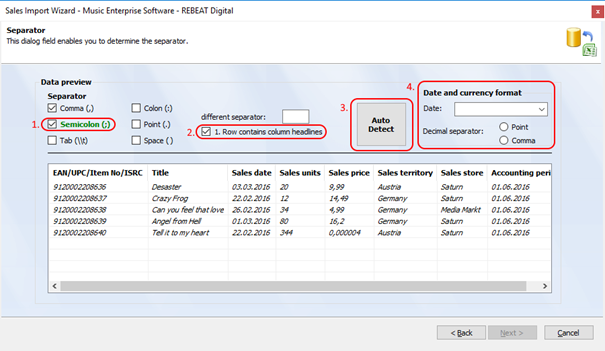
On this page you will choose the import settings, which
are very important for form and content.
A background process has analysed your selected file in
terms of separators and headers and shows you the result of the first 6 rows in
the table preview. The identified separator will be shown in green letters (see
1. in figure above). If your file does not include a column heading in the
first row, you need to uncheck the box “1. Row contains column headlines” (see
2. in figure above). The data preview will refresh immediately. If the result of
the preview does not meet your expectations, you can try out different
separators, until you reach the expected result. With the button “Auto Detect”
(see 3. in figure above), the separators used in your file will be identified
automatically.
In the section „Date and currency format“, you need to
specify which date format is used in your file. It is very important to define
whether the format is day.month.year or day/month/year, for example, and which
separator is used.
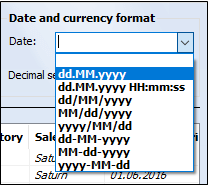
You can either choose a format from the drop-down list, or
define your own:
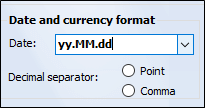
Selecting the used separator is very important for the
correct accounting of external sales. Once you’ve made your selection, you can
click “Next”.
Note: The settings for separators, column headings, date and currency format, etc.
can be saved in a template!
Now you need to assign the columns of your file to the
columns of the required shema (see figure below).
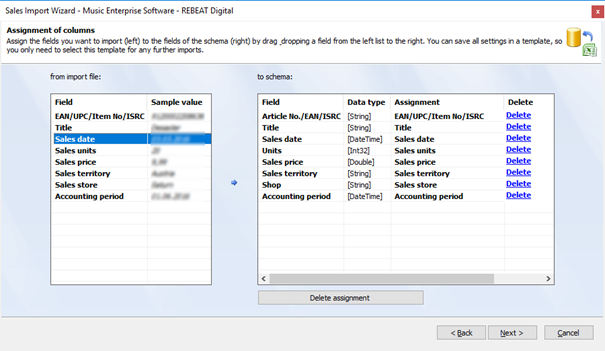
The assignment of columns can easily be carried out by
drag and drop. Click on a field of your file, hold the left mouse button and
drag the field to the proper row on the right. It is very important that the
source data type is the same as the target data type. In the figure above, you
see the finished assignment.
Note: The assignment can be saved in a template.
If you click “delete assignment”, the assignment will be
deleted and it won’t be possible to go to the next page of the assistant.
Only once you’ve assigned all fields, you can click “Next“
and move on to the template page.
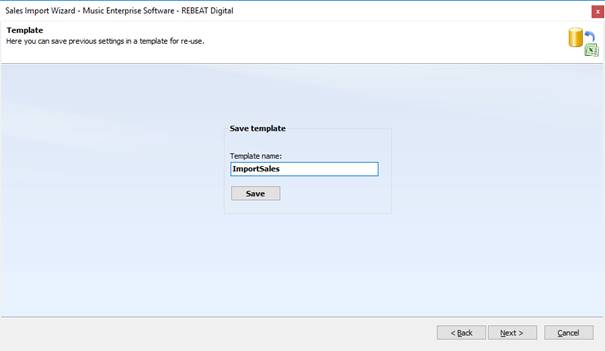
As mentioned before, you have the possibility to save all
settings in a template. You can select this template for a new import process
and don’t have to set it all up again. Just enter a template name and click
“Save”.
Saving a template is optional, so you can proceed by
clicking “Next“ if you don’t want to save a template.
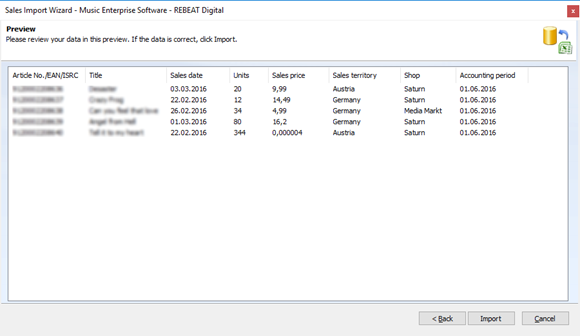
The following preview page shows the data of the first 100
rows, according to your settings. If they are correct, you can click “Import”.
If not, you can go back to the part that needs to be corrected.
Only files that comprise all data in all rows will be
imported successfully.
If any data is missing, a list with all faulty rows will
appear. If that is the case, you need to check the content of the file and
start the import process anew. If you have saved a template, the new import
attempt will be processed a lot faster.
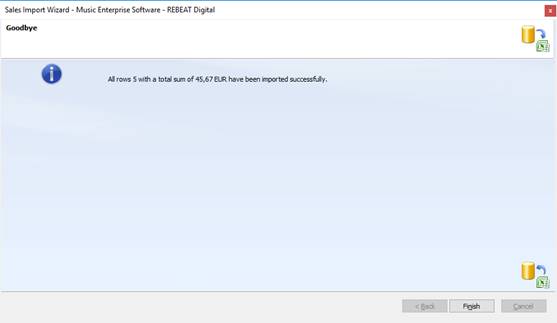
If the import was successful, you will see the import
result. We advise you to check it with your internal accounting data.
Is the
number of rows correct?
Is the
total sum correct?
Is the
currency correct?
If the data is not correct, you have the possibility to
revoke the import process. You can find more information about this in section 6.4 The sales table.
Related Topics
| |